Secure Icon

Installing an SSL Certificate for your website

Why do I need an SSL Certificate?

An SSL certificate is a beneficial for every kind website. It is one of many important security features that limit the interception of sensitive data that is transferred between the client (browser) and the server (your website).

Even websites that don’t transmit sensitive data can benefit from an SSL certificate with a small SEO boost on Google searches. When setup correctly, an SSL certificate will show a green lock icon in the location bar of the browser which will increase the confidence of your clients when they are visiting your website.

1. Preparing the server

If you haven’t done so already install the required software and modules onto your server.

yum install mod_ssl openssl

2. Create the signing request and private key

The following command will create a new private key and a certificate signing request (CSR). The private key should be treated like a password and always have secure file permissions (read only).

openssl req –new –newkey rsa:2048 –nodes –keyout mydomain.com.key –out mydomain.com.csr
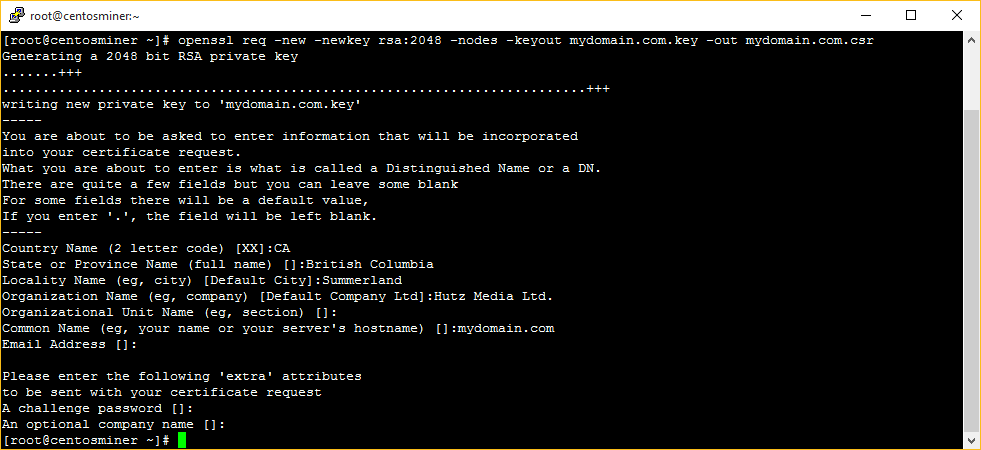
Create private key and CSR

Move the private key to where the key files are stored. On CentOS, the correct location for the private key is /etc/pki/tls/private.

mv mydomain.com.key /etc/pki/tls/private/

3. Upload CSR

Now that you have a private key and signing request, you need to get the public key generated using a Certificate Authority (CA).

Purchase an SSL Certificate from a trusted vendor and when prompted, upload the CSR file that you generated in the previous step.

When setting up a new SSL Certificate you may need to provide proof of your or your company’s identity first. Depending on the type of certificate this can be a long drawn out process with phone calls and faxes or as simple as verifying your email address.

If there are no errors, your signed certificate will be emailed to you. Copy the downloaded public key to your server and move it to where public keys are stored.

mv mydomain.com.crt /etc/pki/tls/certs/

4. Configure Apache

If you haven’t done so already configure Apache to listen to port 443 (don’t forget to open up 443 on your server’s firewall).

vim /etc/httpd/conf/httpd.conf
NameVirtualHost *:443

Add a new virtual host entry for your domain. Remember to disable SSLv3 and SSLv2 because they are vulnerable. You should also configure apache to avoid allow weak ciphers such as ADH.

If you want to support the majority of the web, SSL Certificates are limited to one per IP Address.

Your configuration should look something like this:

<VirtualHost IP_ADDRESS:443>
    DocumentRoot "/var/www/vhosts/mydomain.com/public"
    ServerName mydomain.com:443
    ServerAlias www.mydomain.com:443

    SSLEngine on

    SSLCipherSuite ALL:!ADH:!NULL:!EXP:!SSLv2:!LOW:!MEDIUM:RC4+RSA:+HIGH
    SSLProtocol -ALL +TLSv1 +TLSv1.1 +TLSv1.2

    SSLCertificateFile /etc/pki/tls/certs/mydomain.com.crt
    SSLCertificateKeyFile /etc/pki/tls/private/mydomain.com.crt
</VirtualHost>

When you are finished restart apache and test your server.

service httpd configtest
service httpd restart
Hutz Media Logo

Bryan Wiebe is a web developer and mobile developer living in the Okanagan, British Columbia. He works for Hutz Media Ltd. If you need help getting your website mobile friendly contact me and I’ll provide free consultation and a free estimate.

NetBeans on our Development Environment

What is NetBeans?

NetBeans is an open source IDE used for developing desktop, mobile, and web applications with support for Java, HTML5, PHP, C/C++ and more.

We will be configuring NetBeans to develop our web application on our development server. Our web application files will be on our computer’s hard drive and will automatically upload to the web server as we make changes so that our development environment is similar to the production environment.

NetBeans is my IDE of choice because of its strong support for code hinting and built in versioning (Git).

Create a new project

Step 1: New Project

If you haven’t done so already, download NetBeans here.

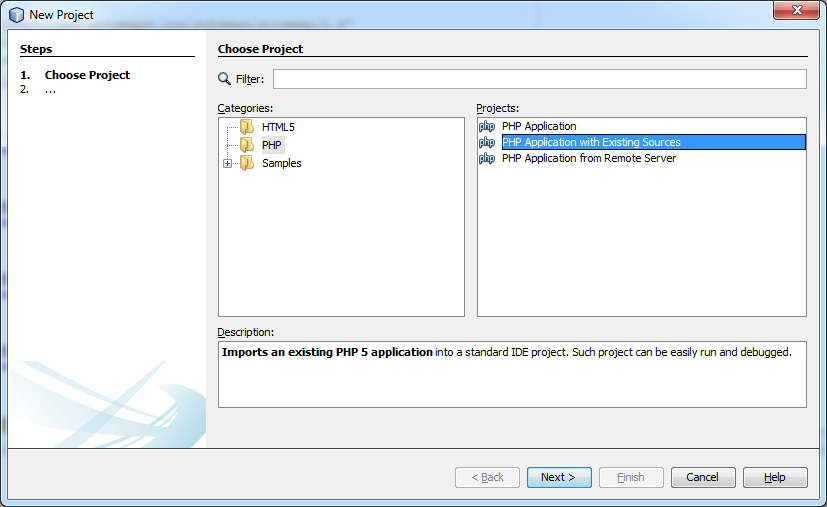
Right click in the projects section and create a New Project or select File -> New Project. Select PHP Application with Existing Sources.

NetBeans new project

Step 2: Project Sources

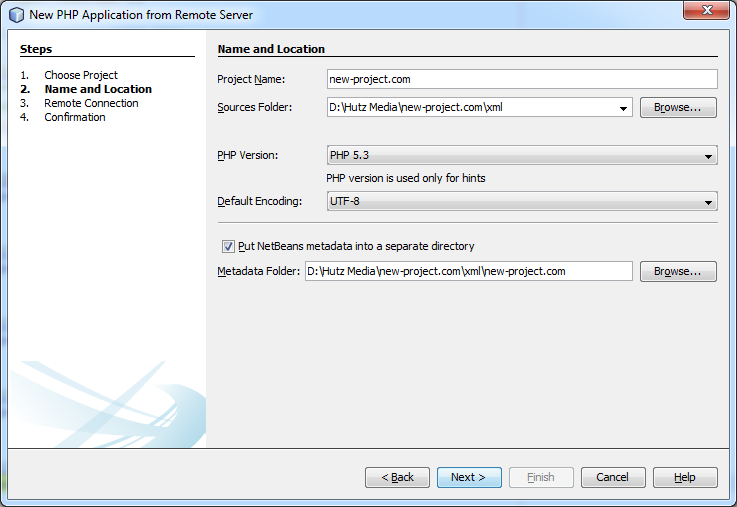
Type in your project name: “new-project.com”. Put the project metadata in a separate folder so that it doesn’t get uploaded to the server. Click “Finish”.

NetBeans project namelocation


Step 3: Remote Connection

In this step we will configure your new project to automatically upload to the development server whenever a file is changed.

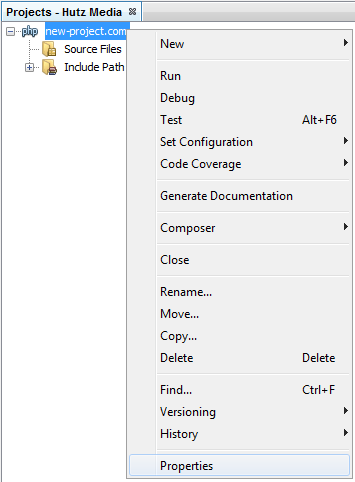
Right click your project and select “Properties”.

NetBeans properties

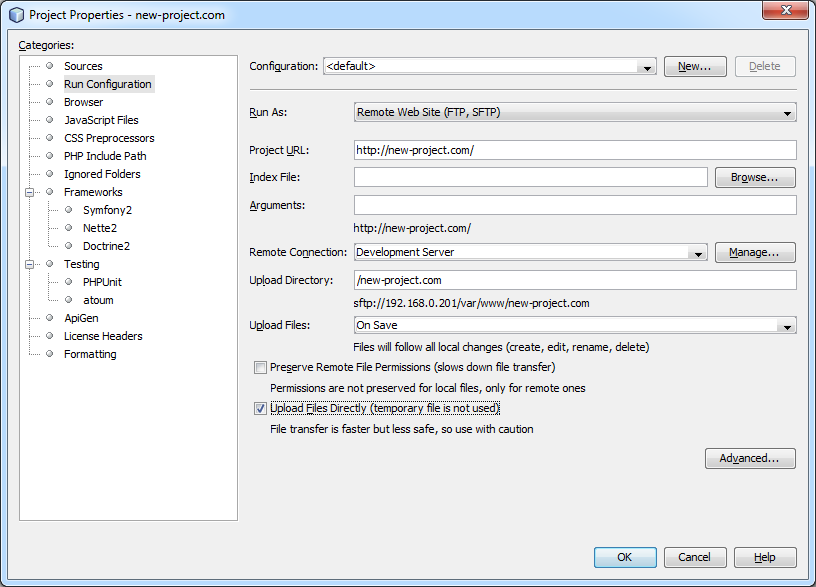
Under “Run Configuration” change “Run As” to “Remote Web Site (FTP, SFTP)”.

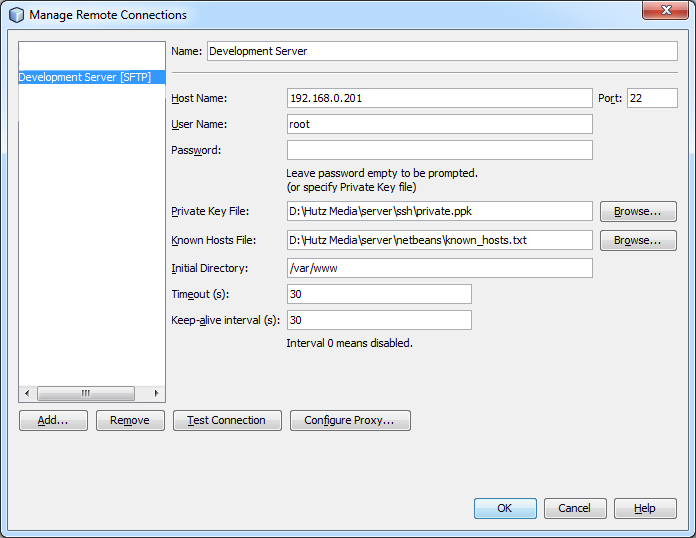
Add a new “Remote Connection” by clicking on “Manage”.

Enter in the host name of your development server that you configured previously. Select the private key that you created previously. Make sure you select the .ppk version of the private key that PuTTYgen outputs by default.

Create or select a Known Hosts File. If you don’t have a known hosts file yet just create an empty text file somewhere.

NetBeans remote connection

Change “Upload Files” to “On Save” and check “Upload Files Directly (temporary file is not used)”.

NetBeans manage properties

If everything is setup correctly you should now be able to work with NetBeans IDE with your project files on your local computer. Whenever you make changes they will automatically be uploaded to your development server.

Hutz Media Logo

Bryan Wiebe is a web developer and mobile developer living in the Okanagan, British Columbia. He works for Hutz Media Ltd. This post is an entry in a blog series covering the configuration and setup of a Development Environment.

Authentication with SSH Keys

Now that your development server is configured you can begin uploading your files to the server. For development we can create a login procedure that doesn’t require a password using SSH keyfiles.

Creating the private and public key

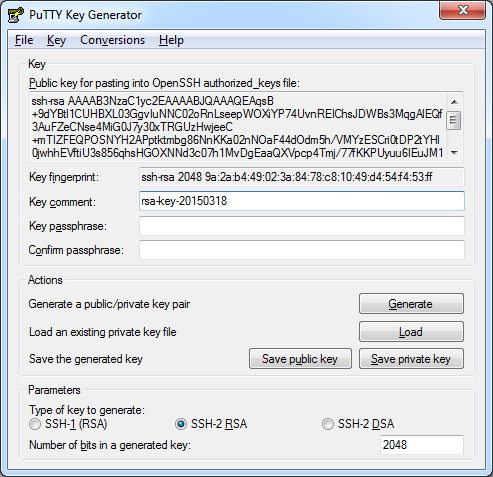
On windows, download the PuTTY Key Generator utility and generate a new public and private key.

PuTTY generator

Save the private key. Software will use one of two different formats for the private key. Export both a ppk file and an OpenSSH key file:

File -> Save Private Key -> Save as private.ppk

Conversions -> Export OpenSSH key -> Save as private.key

Copy the public key to your development server’s authorized_key file for the user you want to authenticate. In our examples we will be using root. On a production server you shouldn’t login as root directly.

If the directory and files don’t exist yet you will need to create them with the following permissions:

cd ~/
mkdir .ssh
chmod 0700 .ssh
cd .ssh
touch authorized_keys
chmod 0600 authorized_keys

Copy the public key, changing the string to match your public key:

cd ~/
cd .ssh
echo ssh-rsa AAAAB3NzaC1yc2EAAAABJQAAAQEAz7tEMrKSSLiYi3vaYu71KQeK+VX0zA07Rc5ZyyenLvihXW3TR7y6Yz9sYMOSgWMewUWosXxGNy17XR2pJSRXtD6mIEcQmhJh47H99bJEHxQ3NOEsRcEwe1yn++T7Q4DthunxzxLY+1M85EYMemz1ato+E341zwEZj0KJr064K9MtrCvC86menKsUFeRoEoj5YafJ02PaUeZiweLw3VyLgmhDCnx3DuSrEtO2O0eBHrziycamrbTE5W69oh+SUpXwnWQEagbHVGGWtXKCYltMiD14rWdqSsrlkAeg2hmDdxuIEn5w41OWJjeVqkXBnA4Pvp+hnCZKQBlCtP2/aSkVaQ== rsa-key-20150318 >> authorized_keys

Troubleshooting

Sometimes things don’t go that smoothly. If you are having problems connecting your client to your server using your new private / public key pairing. Check out the log files on your server for clues on how to solve the problem.

tail –f /var/log/secure

Configuring your FTP client

FileZilla is a popular open source FTP client for windows. It supports SFTP as a method for transferring files between your computer and the server.

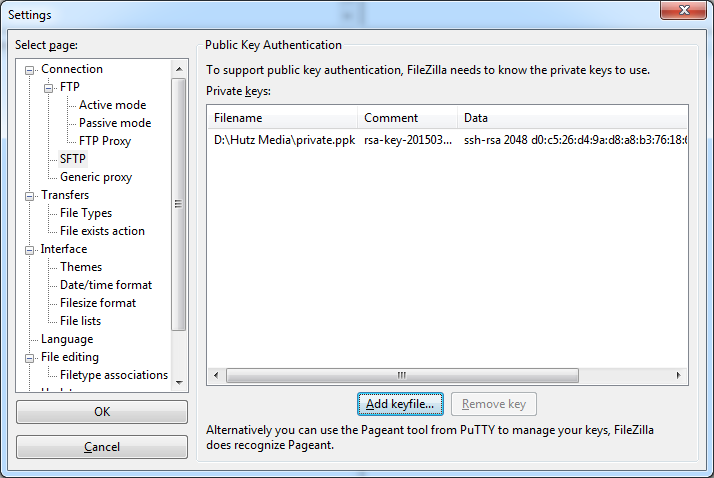
Add your private key to the SFTP settings.

Edit -> Settings -> Connection -> SFTP -> Add key file

Filezilla add private key

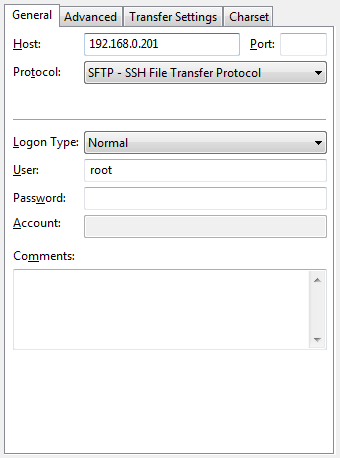
Create a new connection profile. Enter in your development server’s host or IP Address. Select SFTP as the protocol. Enter in your user but leave the password blank. On a production server it is not a good idea to connect as the root user.

Filezilla SFTP

Configuring your SSH client

PuTTY is an open source implementation of SSH for windows. It allows shell access to your server without having to access the development server directly. If using a virtual machine, it is more responsive than the VMWare window and is preferred.

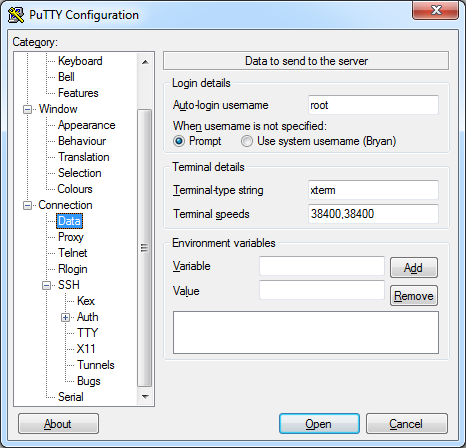
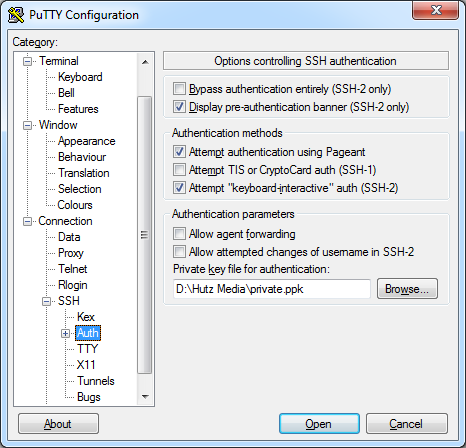
Set the default user to root and the private key file to private.key.

Connection -> Data -> Auto-login username

Connection -> SSH -> Auth -> Private key file or authentication

20150318-.putty120150318-.putty2

Configuring other clients

The setup procedures are fairly similar on other software. Remember that security is important on a production server. You should not be logging in a root directly. Nor should you be creating a passwordless private key when accessing your server. On a production server assign a password to your key.

Hutz Media LogoBryan Wiebe is a web developer and mobile developer living in the Okanagan, British Columbia. He works for Hutz Media Ltd. This post is an entry in a blog series covering the configuration and setup of a Development Environment.

Modifying Hosts File

During web design and web development, it is important to simulate the environment that your website will have when it is officially released. You can simulate your website on a development server as if it is live and hosted on its correct domain name, while keeping the website private and in your local area network.

Be sure to check out our previous blog post where we learned how to setup a Virtual Machine for development.

What is a hosts file

A hosts file is a used by your operating system to map hostnames (or domain names) to an IP address. If the hostname is not found in the hosts file your operating system will look for the IP address through your Internet Service Provider.

Finding the hosts file

In Windows your hosts file is located at:

c:\windows\system32\drivers\etc\hosts

In MacOS the hosts file is located at:

/private/etc/hosts

In most Linux distributions the hosts file is located at:

/etc/hosts

Modifying the hosts file

In Windows you need to edit the file as an administrator. Open notepad as an administrator.

Open notepad as administrator.

The default contents of the file should look like:

# Copyright (c) 1993-2009 Microsoft Corp.
#
# This is a sample HOSTS file used by Microsoft TCP/IP for Windows.
#
# This file contains the mappings of IP addresses to host names. Each
# entry should be kept on an individual line. The IP address should
# be placed in the first column followed by the corresponding host name.
# The IP address and the host name should be separated by at least one
# space.
#
# Additionally, comments (such as these) may be inserted on individual
# lines or following the machine name denoted by a '#' symbol.
#
# For example:
#
#      102.54.94.97     rhino.acme.com          # source server
#       38.25.63.10     x.acme.com              # x client host

# localhost name resolution is handled within DNS itself.
#	127.0.0.1       localhost
#	::1             localhost

Find the IP Address to your local development server and append the desired domain to the hosts file. For example:

192.168.1.201		example-website.com

Save the file and open your browser (some browsers require that you close them before the addresses in the hosts file are updated). Type in example-website.com. If you already have a virtual host configured on your development server, it will now point to your website. If you don’t have a virtual host configured it will point to the server’s default website.

When it’s time to release example-website.com don’t forget to remove this line from your hosts file or you may be wondering why changes your clients make to the website aren’t showing when you look at them on your computer.

Using a Virtual Machine for Development Environment

During development of web applications it is a good idea to use a development server instead of the live production server. There are many reasons for this such as a simple coding error taking down the entire production server and all of your client’s web pages with it.

You could try to running a web server directly on your Windows or MacOS operating system. However, this can be a pain to set up and get going and chances are that the differences in the environment between your personal OS and the production server will be enough to cause headache when it is time to deploy.

At Hutz Media, we use a dedicated CentOS Linux server running 24/7 for development and testing. For part time developers a virtual machine running in the background will work just as well.

We also CentOS on our production servers. I find that it is always best to have your development environment as close to your production environment as possible.

In this post we will be using VMware Player 7 to setup and install as LAMP web development environment for CentOS. You can also use VirtualBox.

Download CentOS

CentOS is a Linux project that is derived from sources freely provided by Red Hat. Download the latest minimal ISO image at http://www.centos.org/download/. The file should be around 566MB.

Create a New Virtual Machine

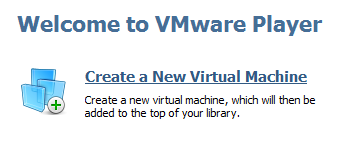
Once you have finished download the CentOS ISO image open VMware Player and create a new virtual machine.

Create a virtual machine

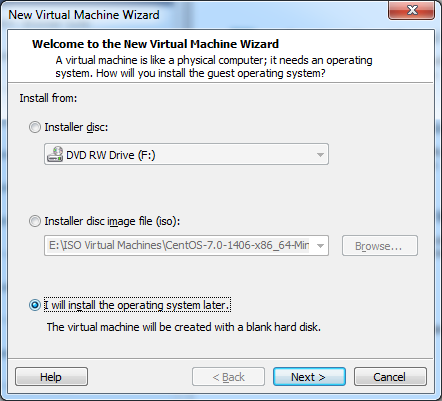
If using the Easy Install Wizard, VMware Player will try to install the GUI Desktop version of CentOS. We want to install the server version so we need to avoid the Easy Install process and install CentOS manually.

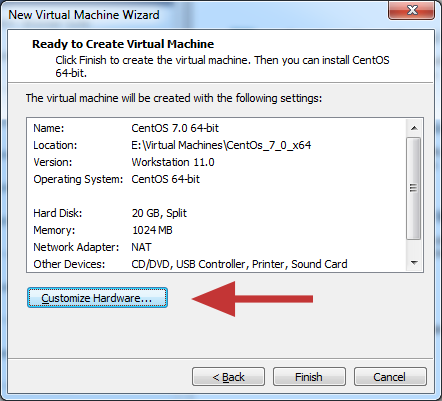
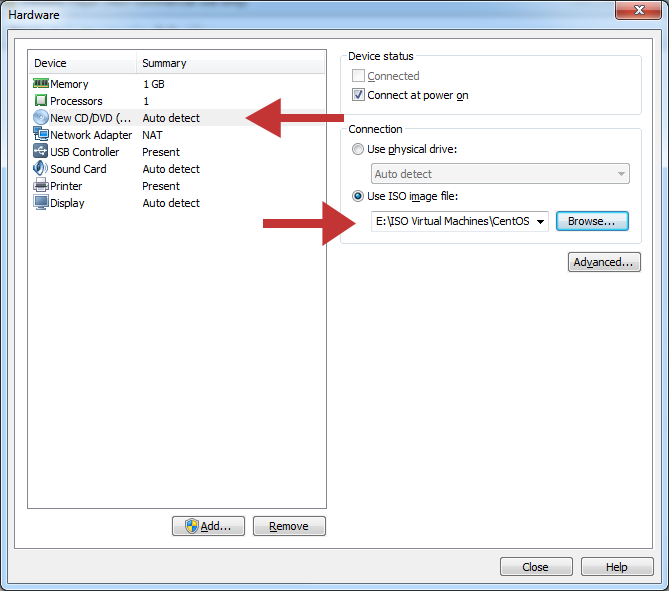
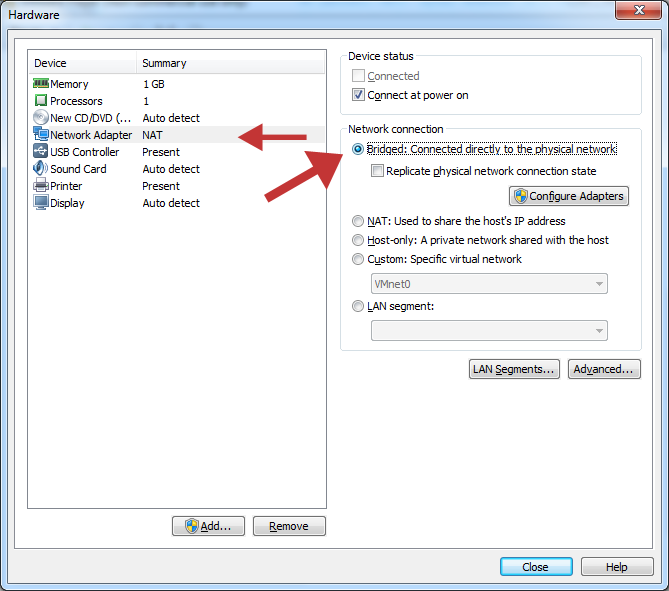
Select “I will install the operating system later”. On the next window select “Linux” and “CentOS Linux 64-Bit”. Under the Hardware settings window select the ISO you downloaded as the startup CD and also change the network settings to “Bridged”. Click “Finish” and power up the virtual machine.

Follow the directions to install CentOS. While it’s installing you can setup the root password. This should only take about 10 minutes.

I will install later. Custom hardware. Select CentOS 7 iso image. Bridged network.


Setting up network

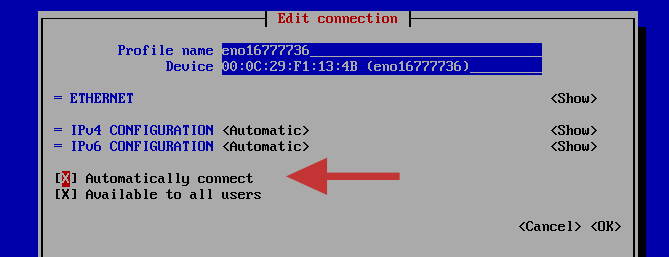
CentOS minimal is installed by default with the network turned off. Type “nmtui” in the console to get to the network adapter settings. Set the ethernet device to automatically connect through DHCP (or configure your connection manually). Restart the network service.

service network restart

Setting up network

Using yum to install services

Now that CentOS is installed on your new virtual machine it is time to get your web development services installed and ready.

First you will want to update your server. Using the virtual machine window and the username and password you setup in the Easy Install wizard, log into your root account.

Use the yum command to update your server software to the latest.

yum update

Now install the services you’ll need for your LAMP environment.

yum install php php-cli php-pdo php-mysql php-gd httpd mod_ssl mariadb mariadb-server

Starting and configuring services

Let CentOS know you want to start these new services on bootup.

systemctl enable httpd.service mariadb.service

Start the services.

systemctl start httpd.service mariadb.service

Allow http and https traffic through the firewall.


firewall-cmd –permanent –zone=public –add-service=http
firewall-cmd –permanent –zone=public –add-service=https

Test your new LAMP server. Find out your virtual machine’s IP address by typing:

ip addr

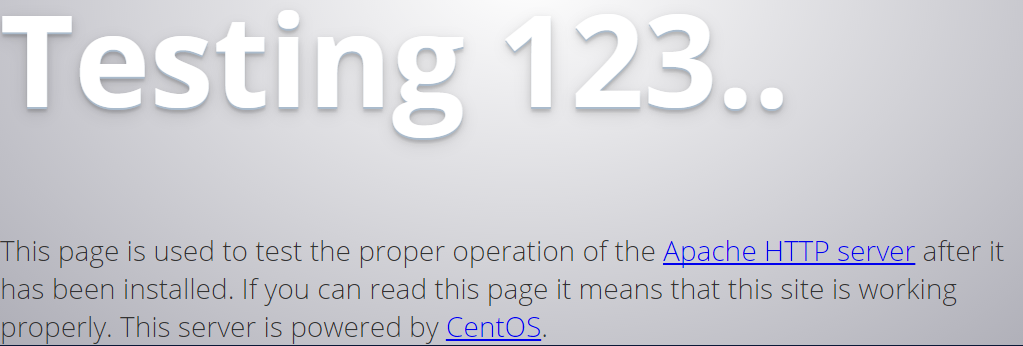
Open up your browser to http://MY_IP/. You should see the following page:

CentOS test http page.

Your new virtual machine is now setup and ready for development. You can enjoy low latency development that is nearly identical to your production environment without any additional hosting costs or having to purchase a stand-alone server.